Yeah, I actually ran the original version for 3 hours without the bearing with no problem, I just figure it doesn’t hurt? For me at least, the weight isn’t that big of a deal.
1 Like
I’ve now got my hop up seemingly working alright with stock airsoft components from ebay. I built a bare-bones 3d printed shell that bolts together with heat set inserts, the intent being that I “insert derive” it into the final design to add whatever mounting tabs I need and then bolt a feed tube on.
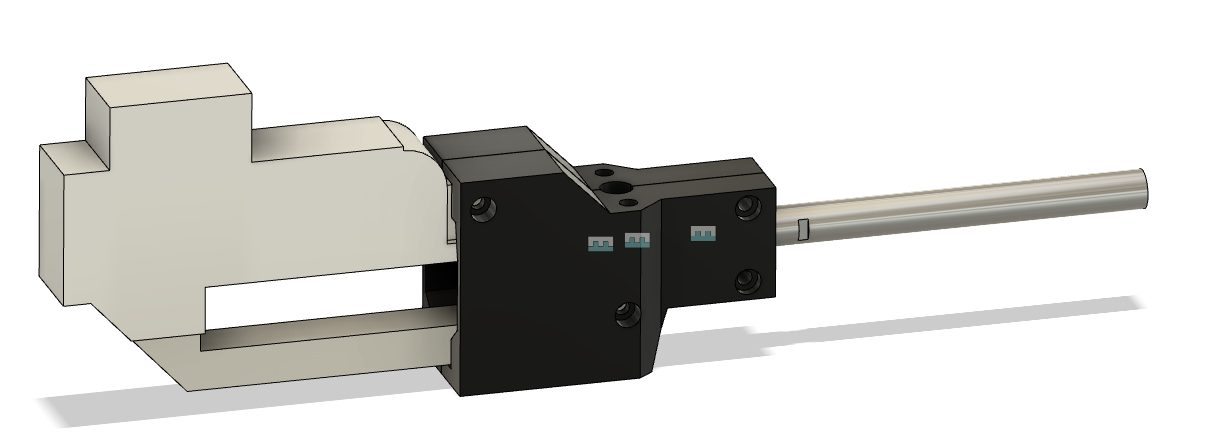
I tested it and got it working both with the 6 year old DE gearbox I had, as well one I newly acquired from ebay. Shoots around 45m/s, so around 150fps, which I guess is legal, and plenty faster than the old defender one I had from jwatte did, which never sealed all that well.
For reference, the parts I used here were:
- DE gearbox
- Barrel
- Bucking (70 super)
None of which are anything special, just random things from ebay. I’ll probably switch out for evike parts once they start operating again.
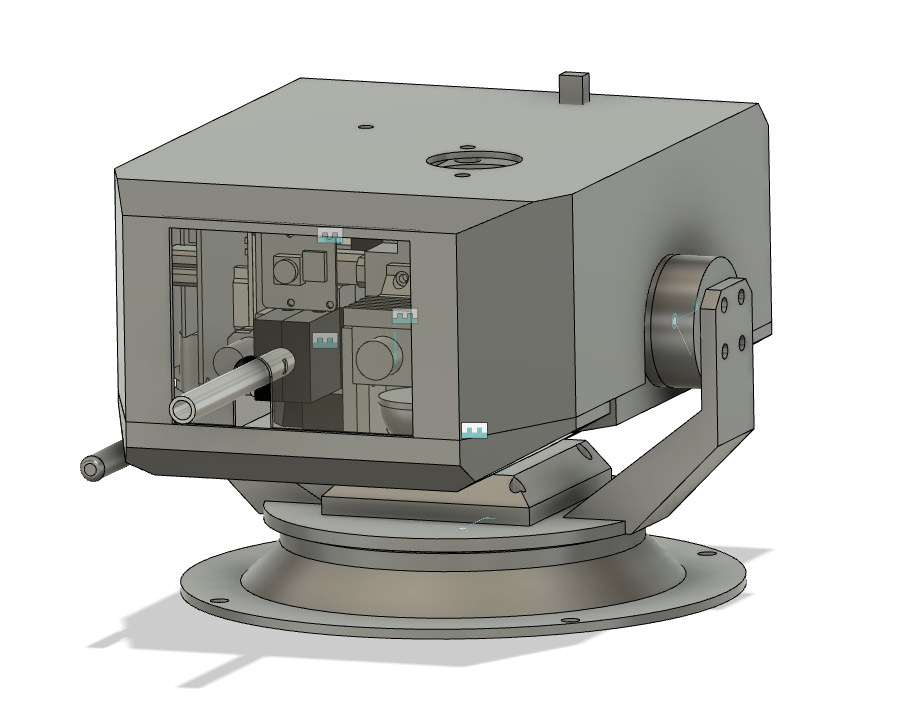
So, in my typical spirit of way over-engineering things (and with the extra time until another event), I’m doing the first major rev on my turret since I first built it 5 years ago. The old one worked relatively well on the first Super Mega Microbot, but it was relatively flexy, which somewhat negated its inertial stabilization. Also, the cable management between top and bottom was always challenging, as was housing it after I switched to a raspberry pi for automatic target tracking. The necessary volume to enclose was enormous.
My new rev takes a page from Eric’s playbook of having the turret be basically an entirely separate robot. I wanted to see if I could do it while using basically all of the same components as my regular robot and making almost nothing have to move relative to one another. So, here’s a concept that uses the hop-up and loader described above, complete with:
- A raspberry pi / with the same CAN+IMU+RF hat I have in the quad A1
- Two slightly modified moteus controllers mounted on the pitch and yaw axis along with 3506 brushless gimbal motors
- The lipo that I used for Super Mega Microbot 1
- The power distribution board / pre-charge board used in the quad A1
- A standalone FPV camera
- The raspberry pi camera too, for target tracking
- A laser diode
The only subcomponent that has to move or flex is one power and data cable between the pitch and yaw servos, and it only needs to move the few degrees that the turret section can pivot. Everything else is static relative to each other.
I can configure my RF master to communicate bidirectionally simultaneously with both the robot and the turret, so there’ll just be one control station. That way I can keep the same control semantics I had before, where forward always moves in the direction the camera is facing, although now that will be managed in the control center, not on the robot.
Seems likely things will change as I try to actually build it, we’ll see!
1 Like
That looks massive!
I imagine there’s some kind of slew ring in the base? And maybe some coggin on the base to drive with a pinion in the turret?
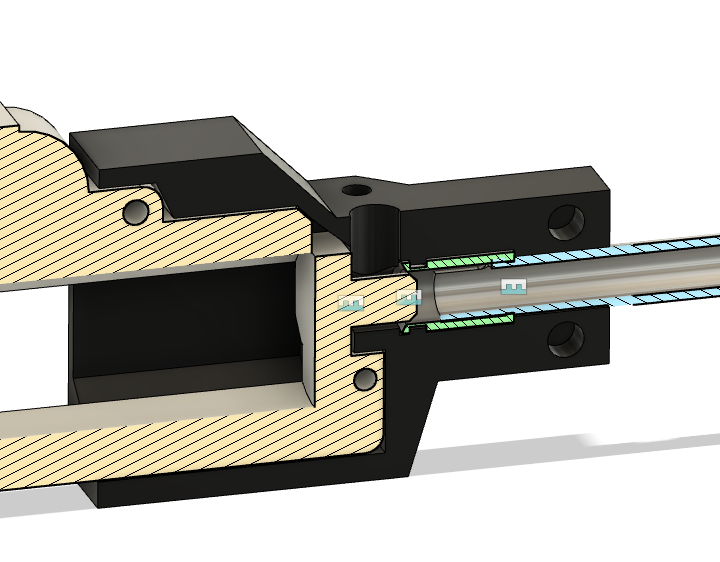
Yeah, just a thrust bearing. I’m going to try with the same 3506 gimbal motor in the base that I have on the pitch axis, you just can’t see it in the renders.
Of course, as soon as I disassembled my loader and reassembled it onto the turret frame, I started to get BB’s being stuck again. Still happens even when I remove it from the frame, so I guess something was just too close to the edge? Anyway, trying some tweaks to that now before I film my frame in progress spewing BBs.
I tweaked the exit geometry a bit, and seemed to have gotten it back to working reliably. Now the turret is partially assembled, and can spew BBs into what would be the receiver if I had installed the final tube:
The capacity works out to around 450, which should be sufficient. I could arbitrarily expand it, but this works aesthetically.
It’s up to 700g so far, with a bit more yet to add… I’m guessing it will be about 1kg total. That should be well within the range of what I can carry. There are some good things about having a 10kg mech!
And @jwatte, here’s a section view showing the gimbal motor and thrust bearing in the base:
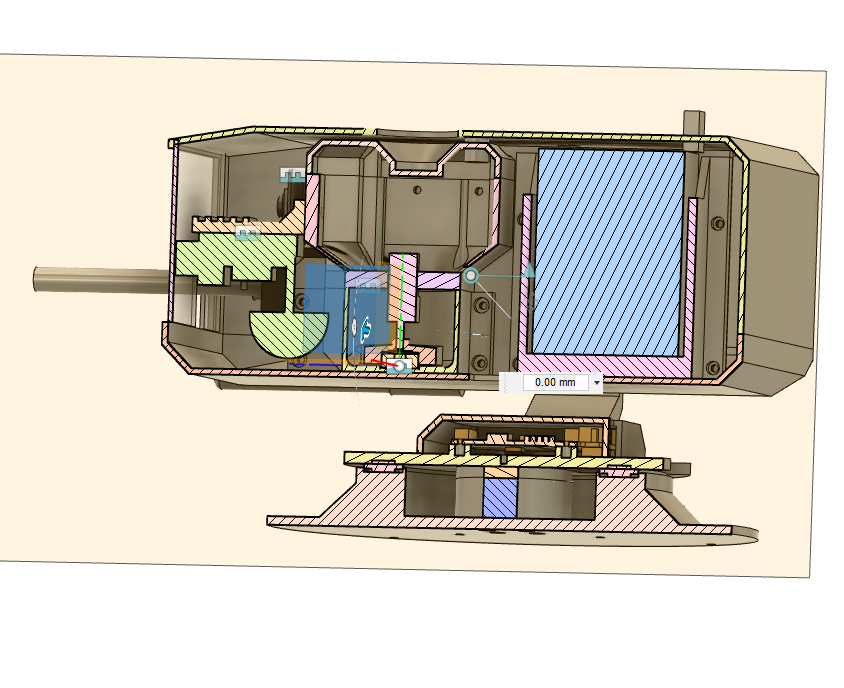
1 Like
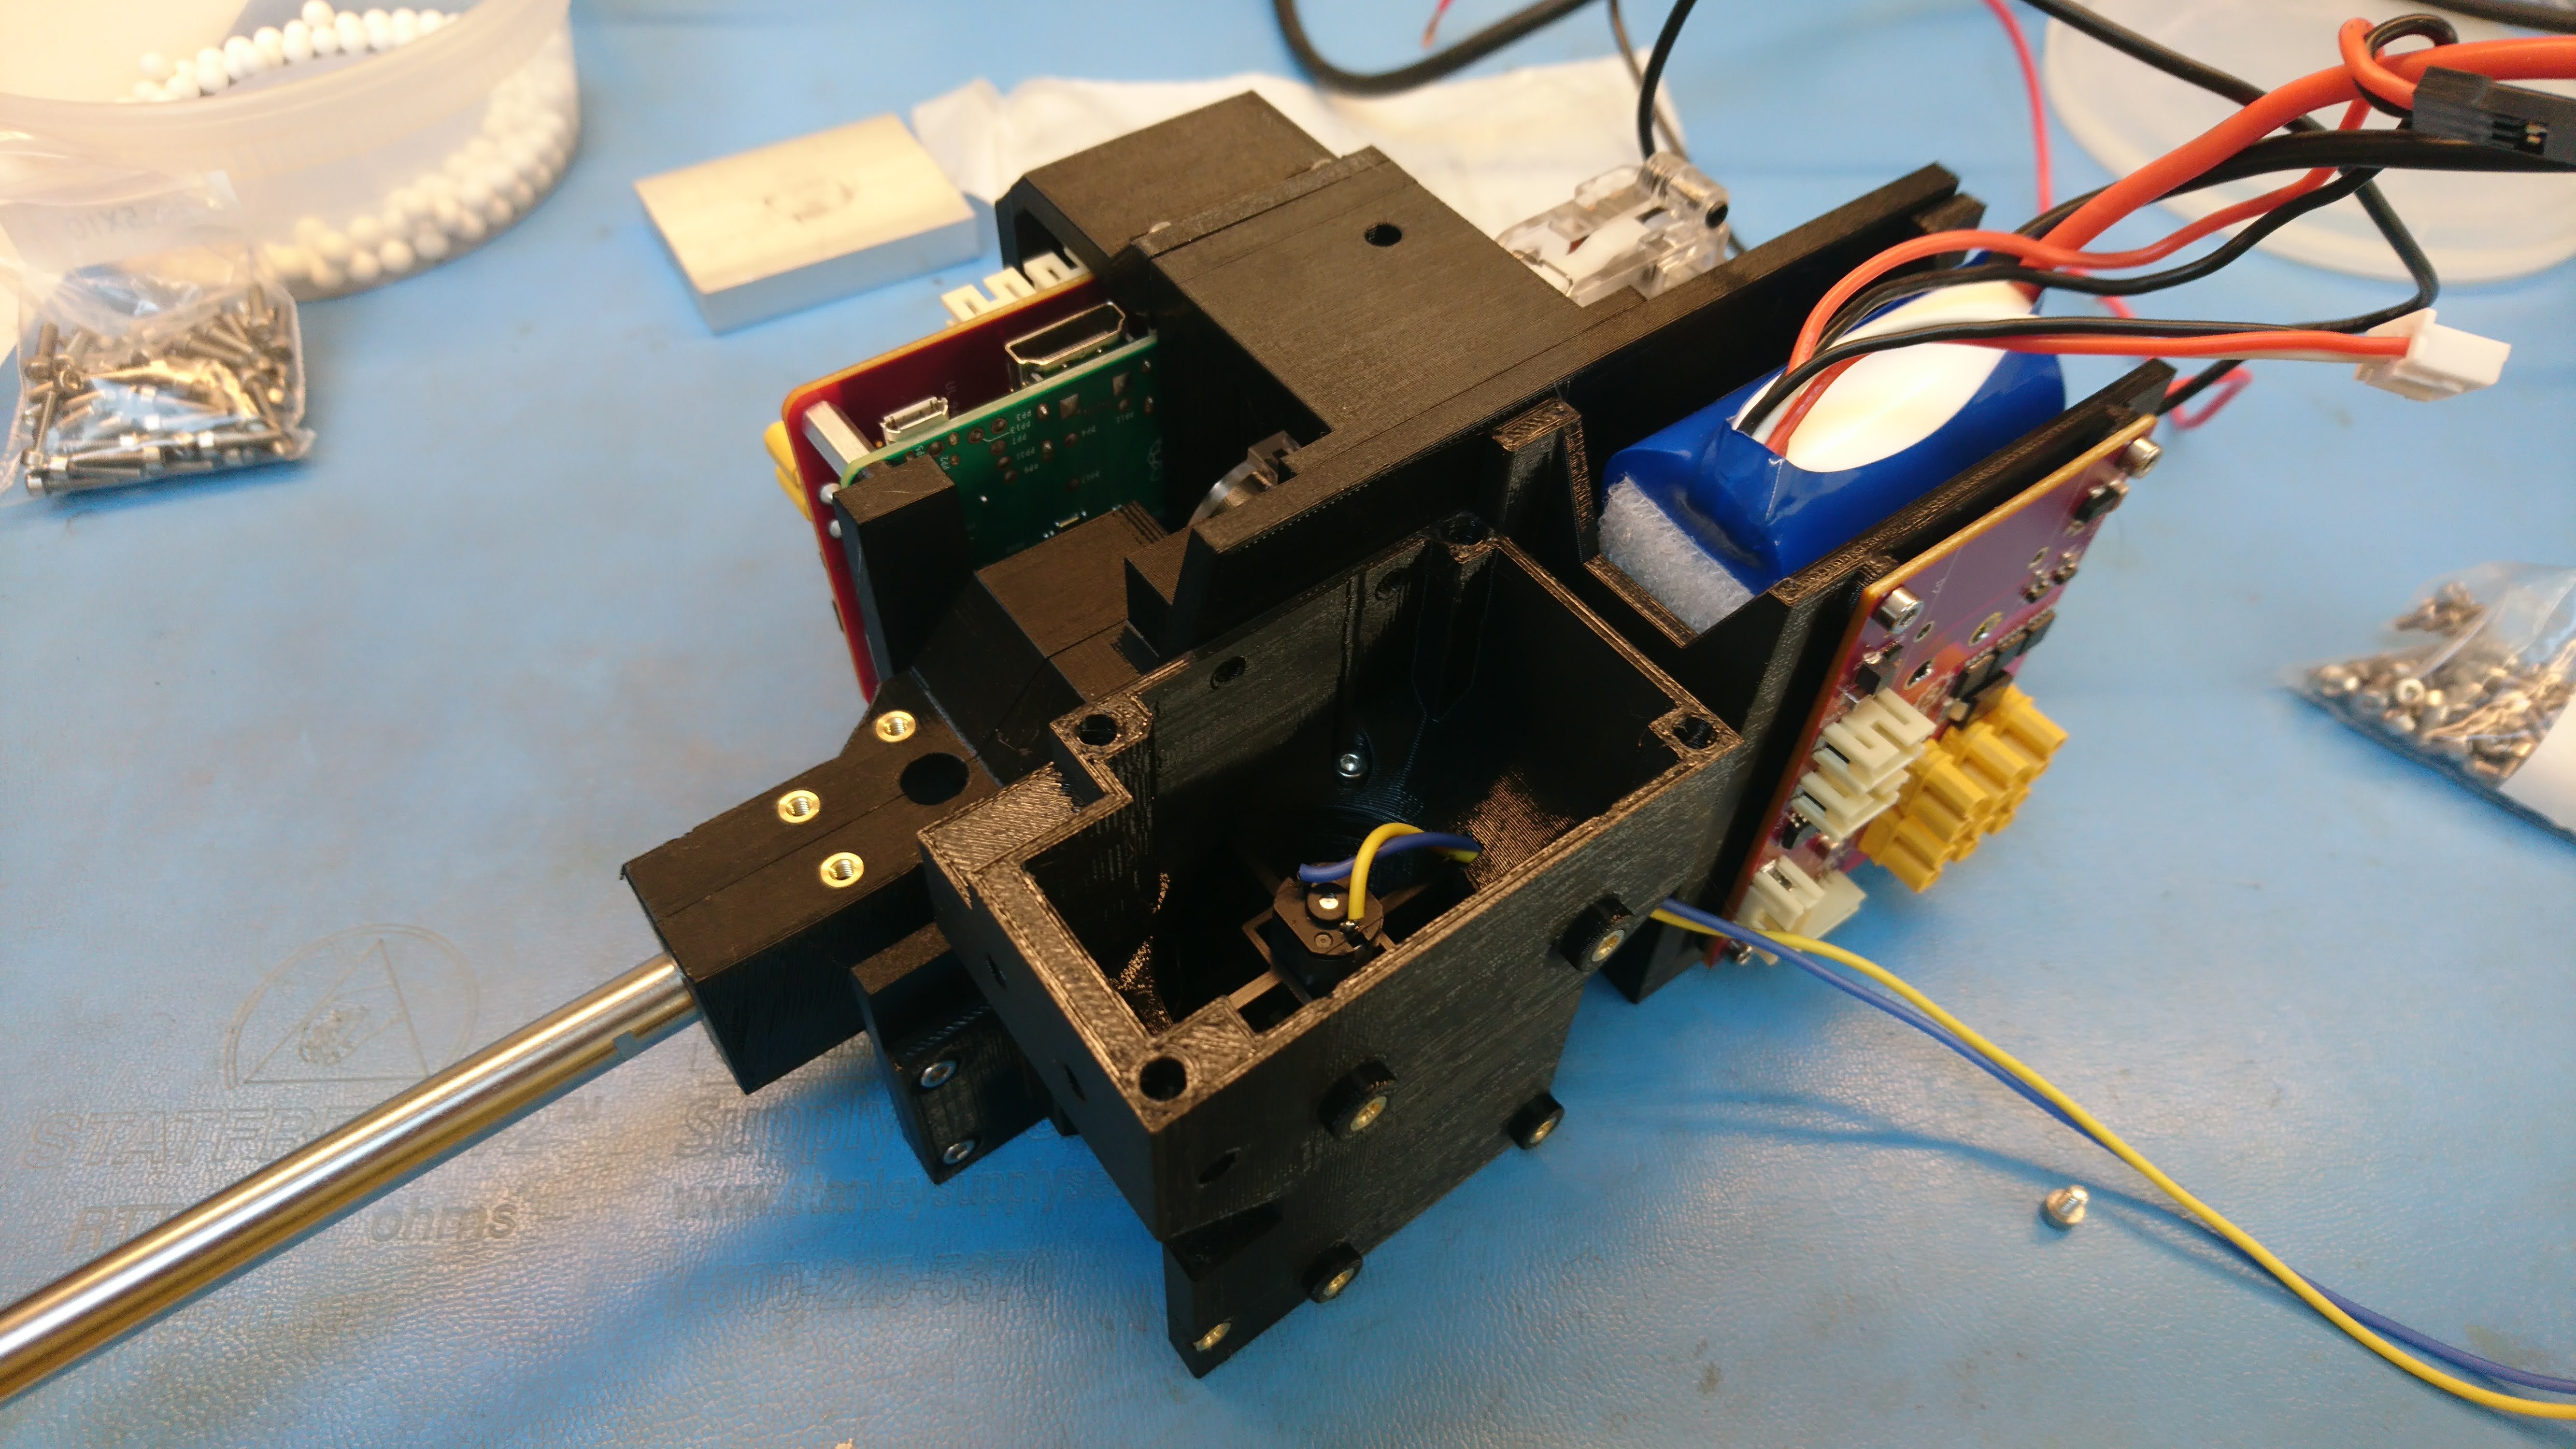
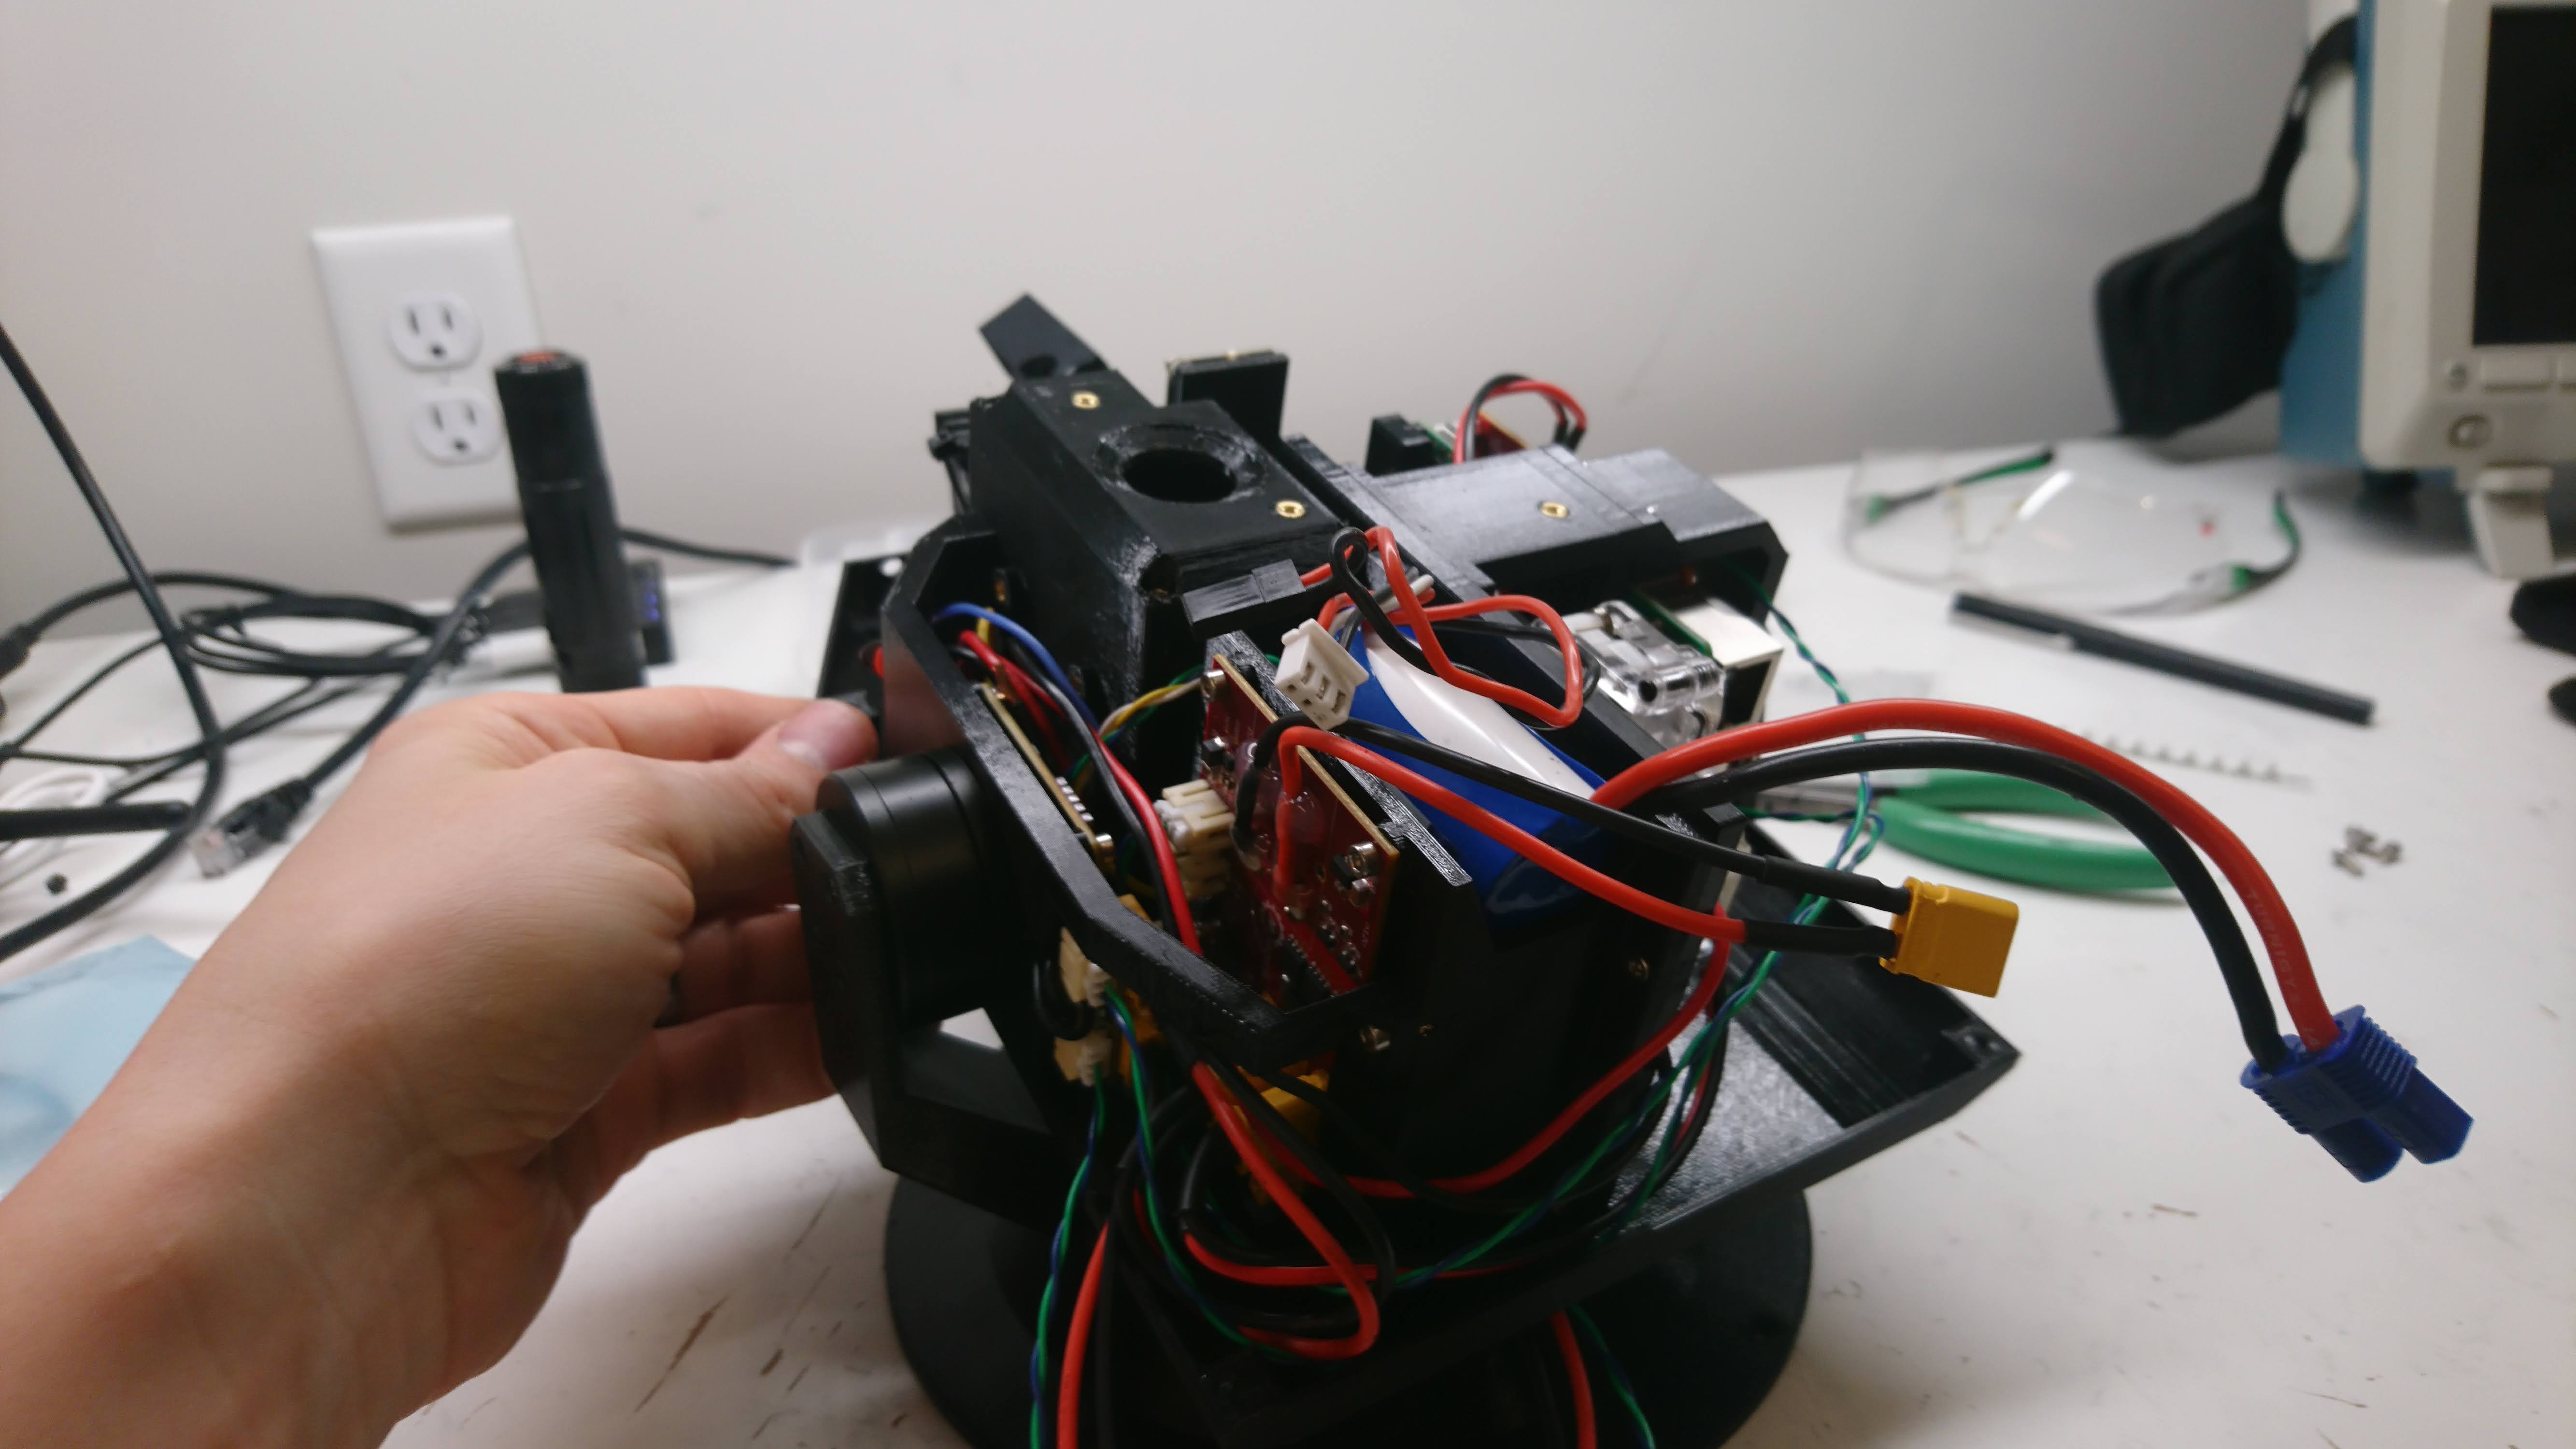
And now a pretty much complete mechanical assembly. I’m still missing the outer shell and the one new circuit board.
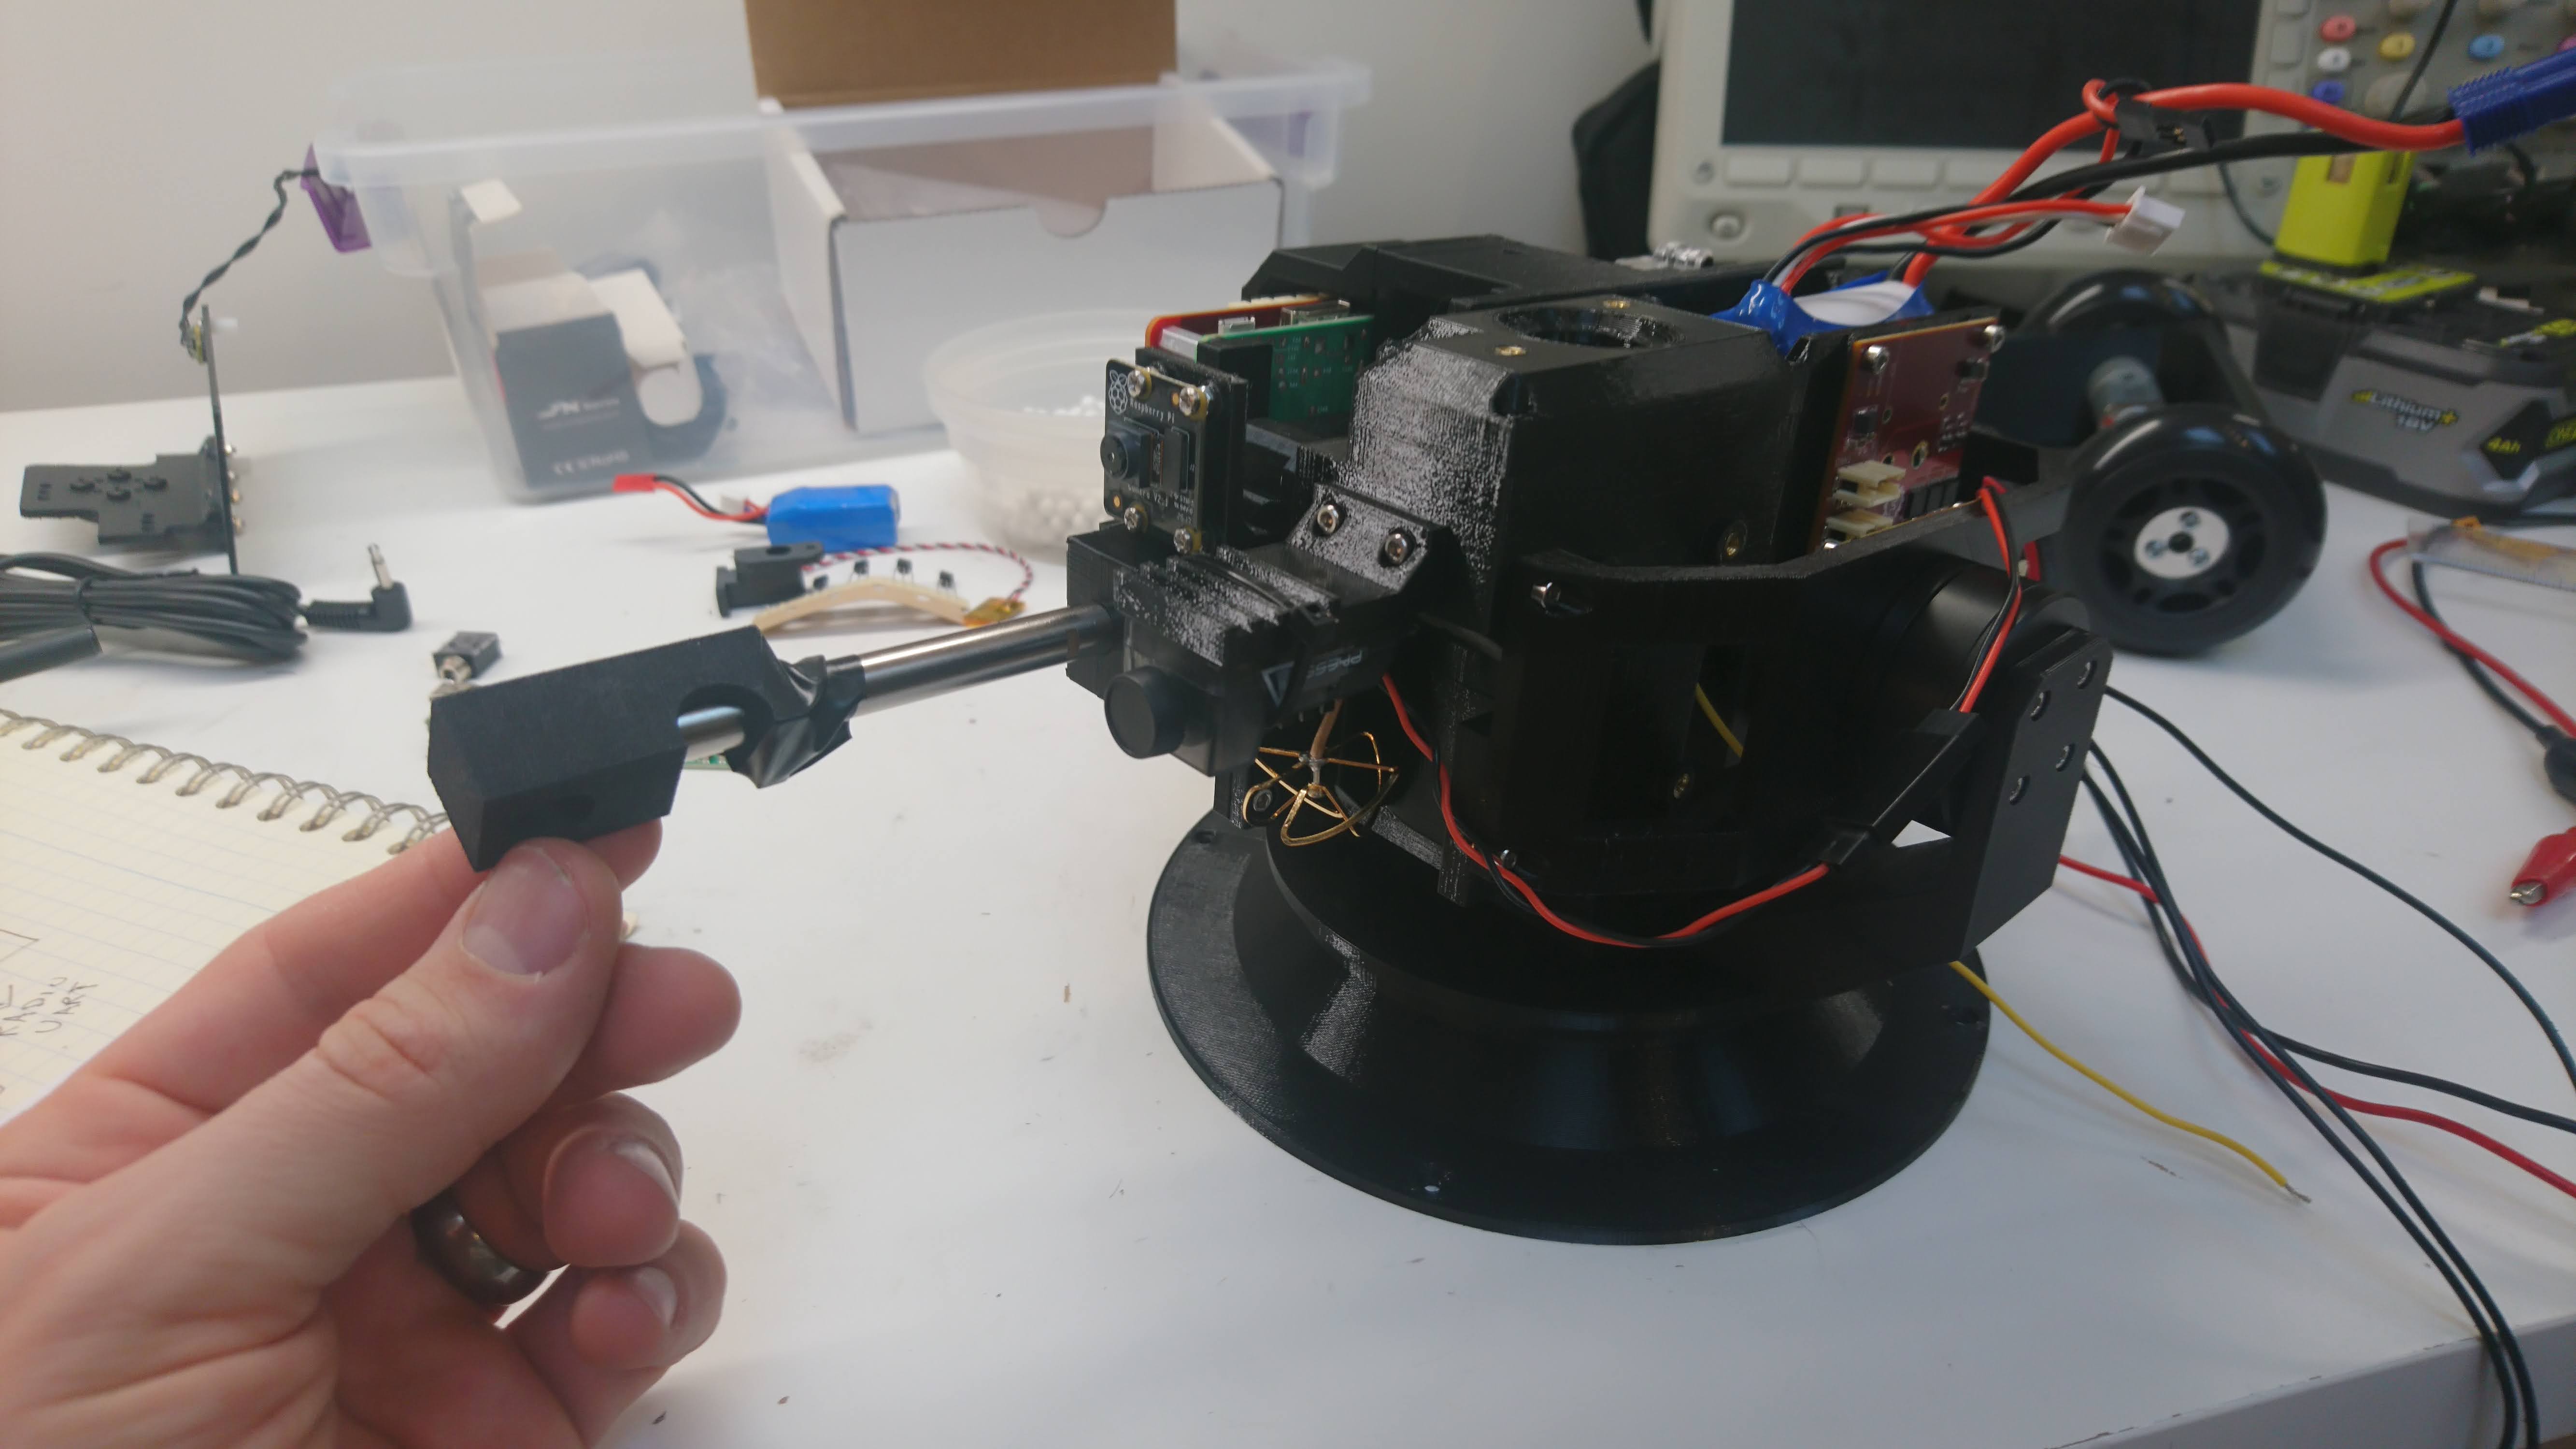
It is currently 1.1kg, and it looks like I got the center of mass slightly off so it is front heavy. Once I do a draft shell print I’ll double check, fix it, then re-print everything to get it closer to balanced w/ and w/o a full magazine.
I can do the shell with what I have, then making much more in the way of progress is waiting on more parts and the one circuit board.
Nice pictures!
450 BBs is one a second for 7 minutes 30 seconds. Or, alternatively, enough to take down the enemy with a 4.44% hit ratio. I bet that’ll be enough!
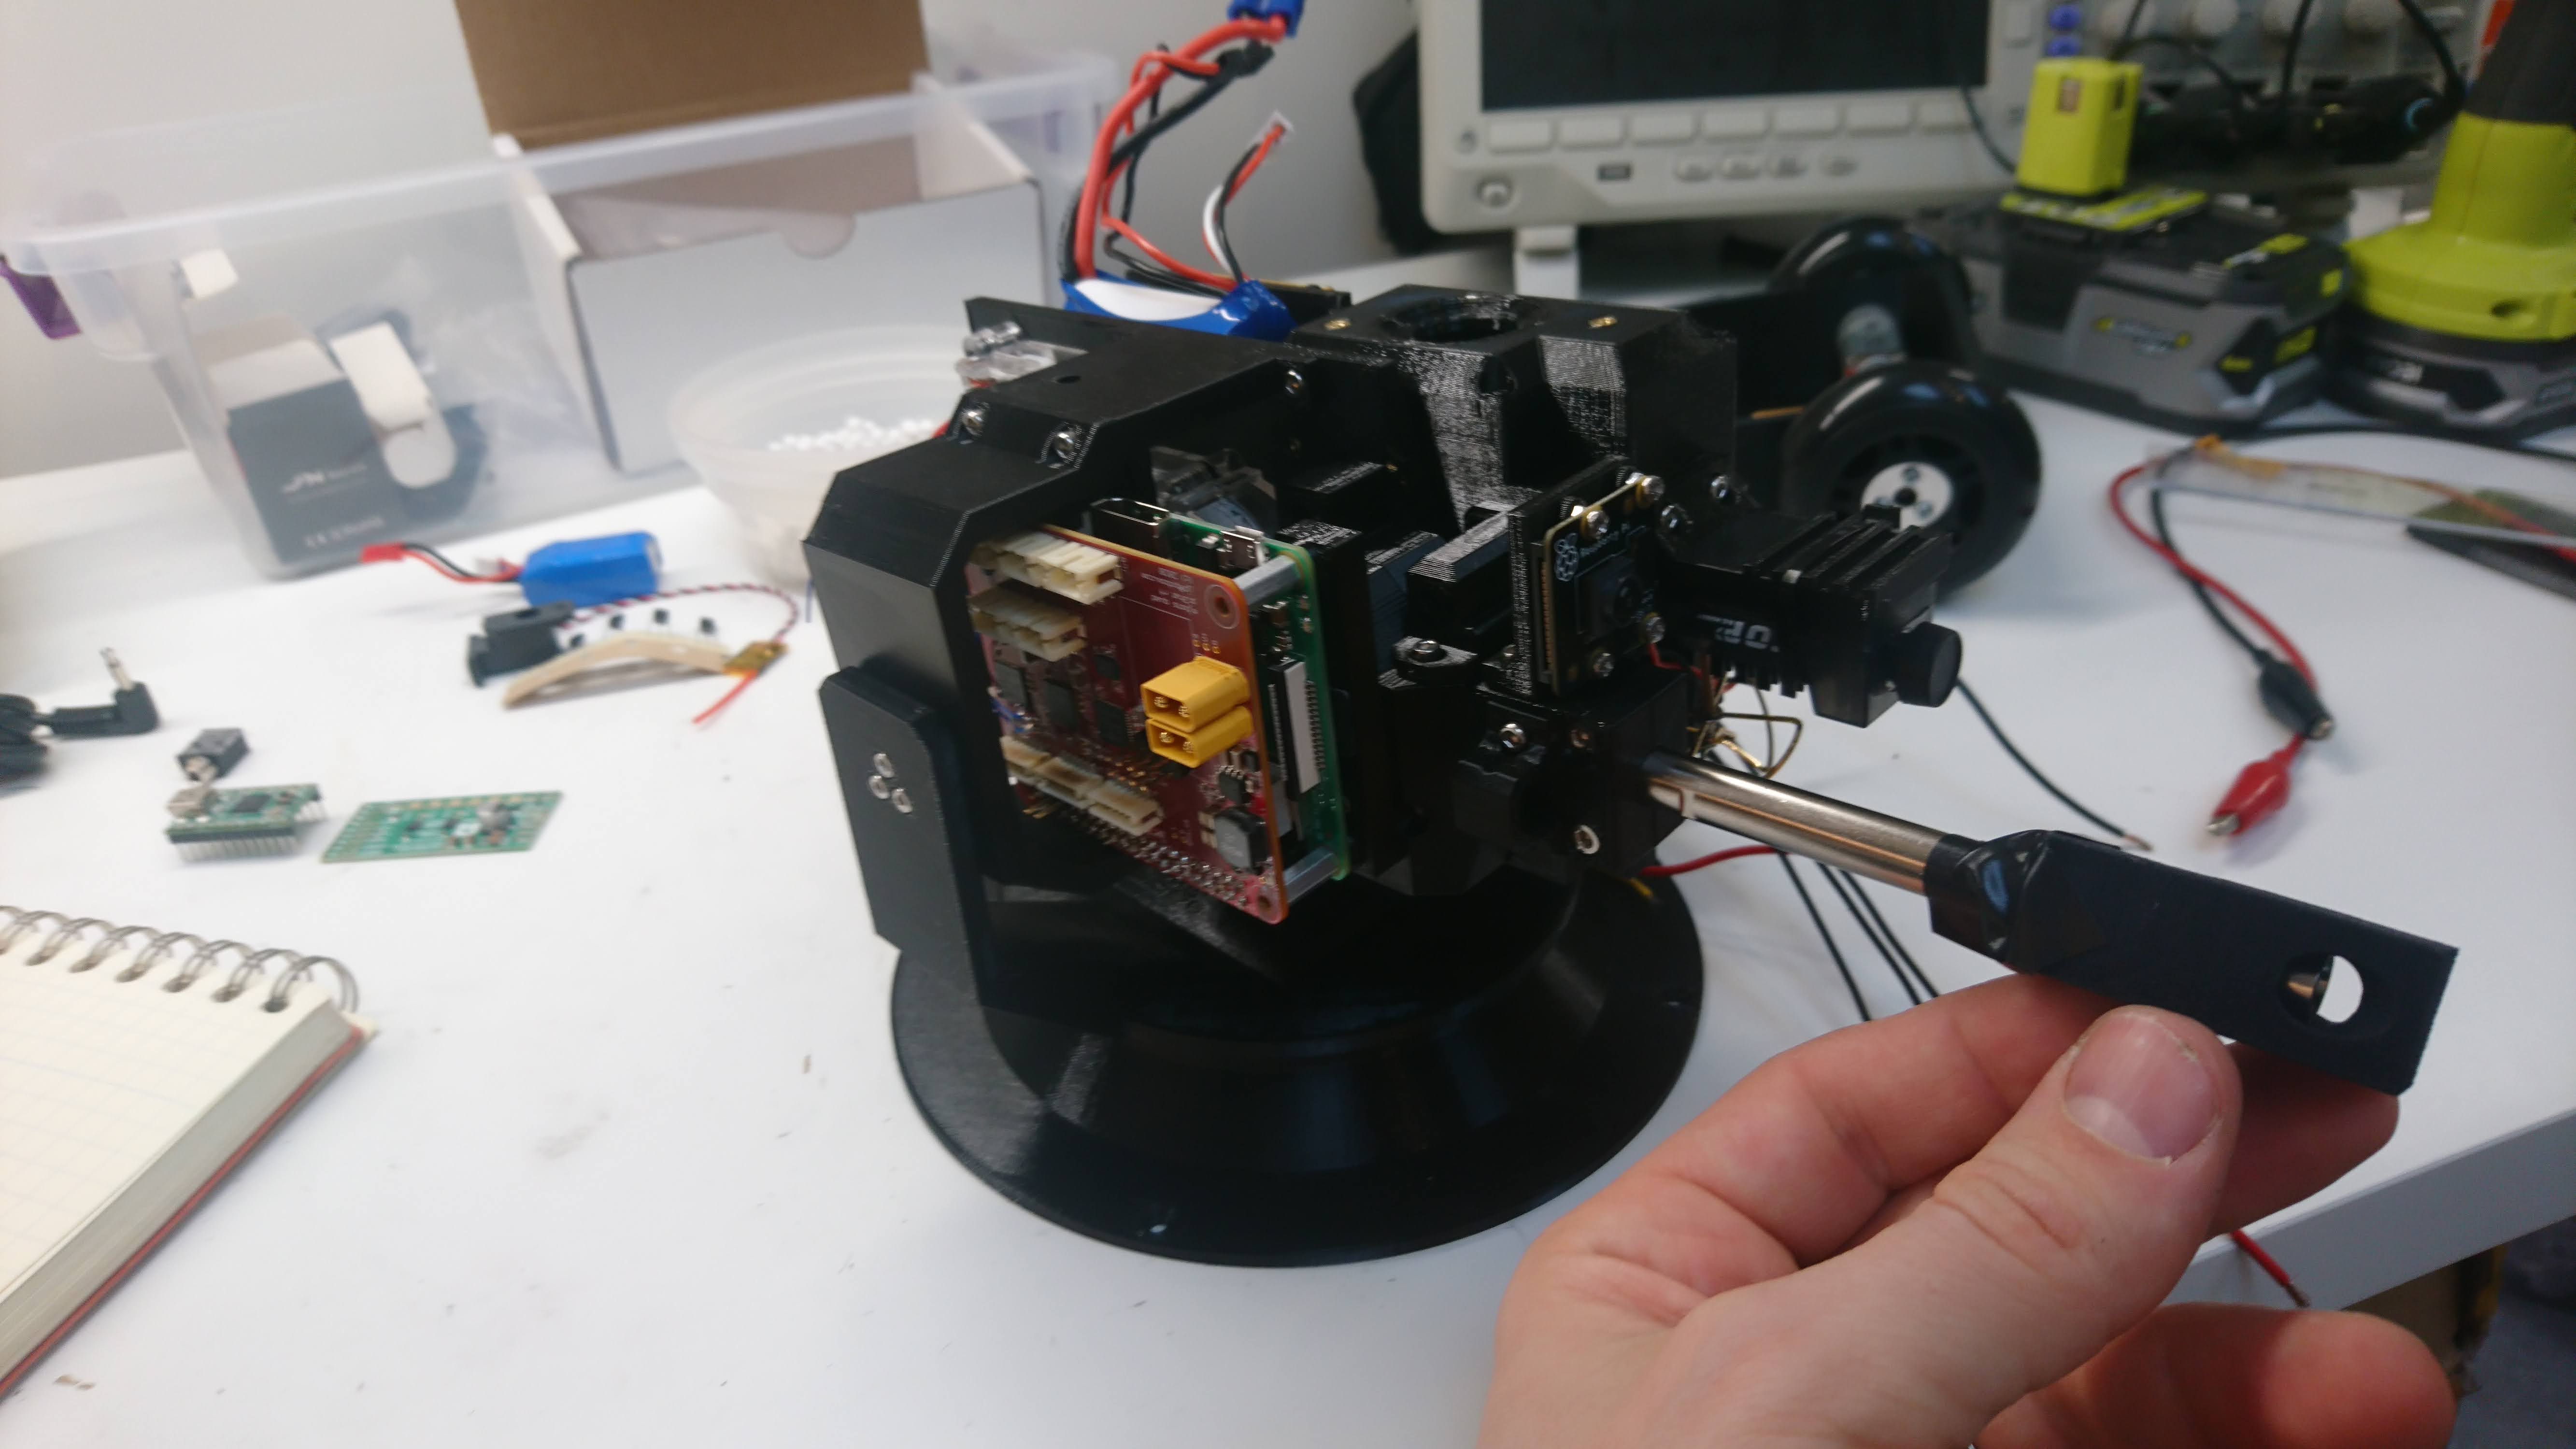
Now closer to balanced and with nearly everything in place, just the one PCB missing. My intent was to have it basically balanced with no ammo, and then forward heavy once it is loaded. I figure aiming at the ground is better than the sky if it is going unpowered for some reason.
My printers are definitely getting a workout here, between cascading changes and just screwing things up.
I got enough wired up that I was able to power the axes independently today. I had forgotten my old design had a boost regulator to get more current into the gimbal motors. Now, I’ll just switch to a 4S battery since everything is good up to +30V anyhow.
Here’s a video just showing position control on the pitch moteus controller. For the actual turret, I’m planning on having the rpi send torque commands rather than position. Position mode here is relatively noisy as I’ve got it set up, since the velocity feedback from the absolute magnetic encoder is crap.
1 Like
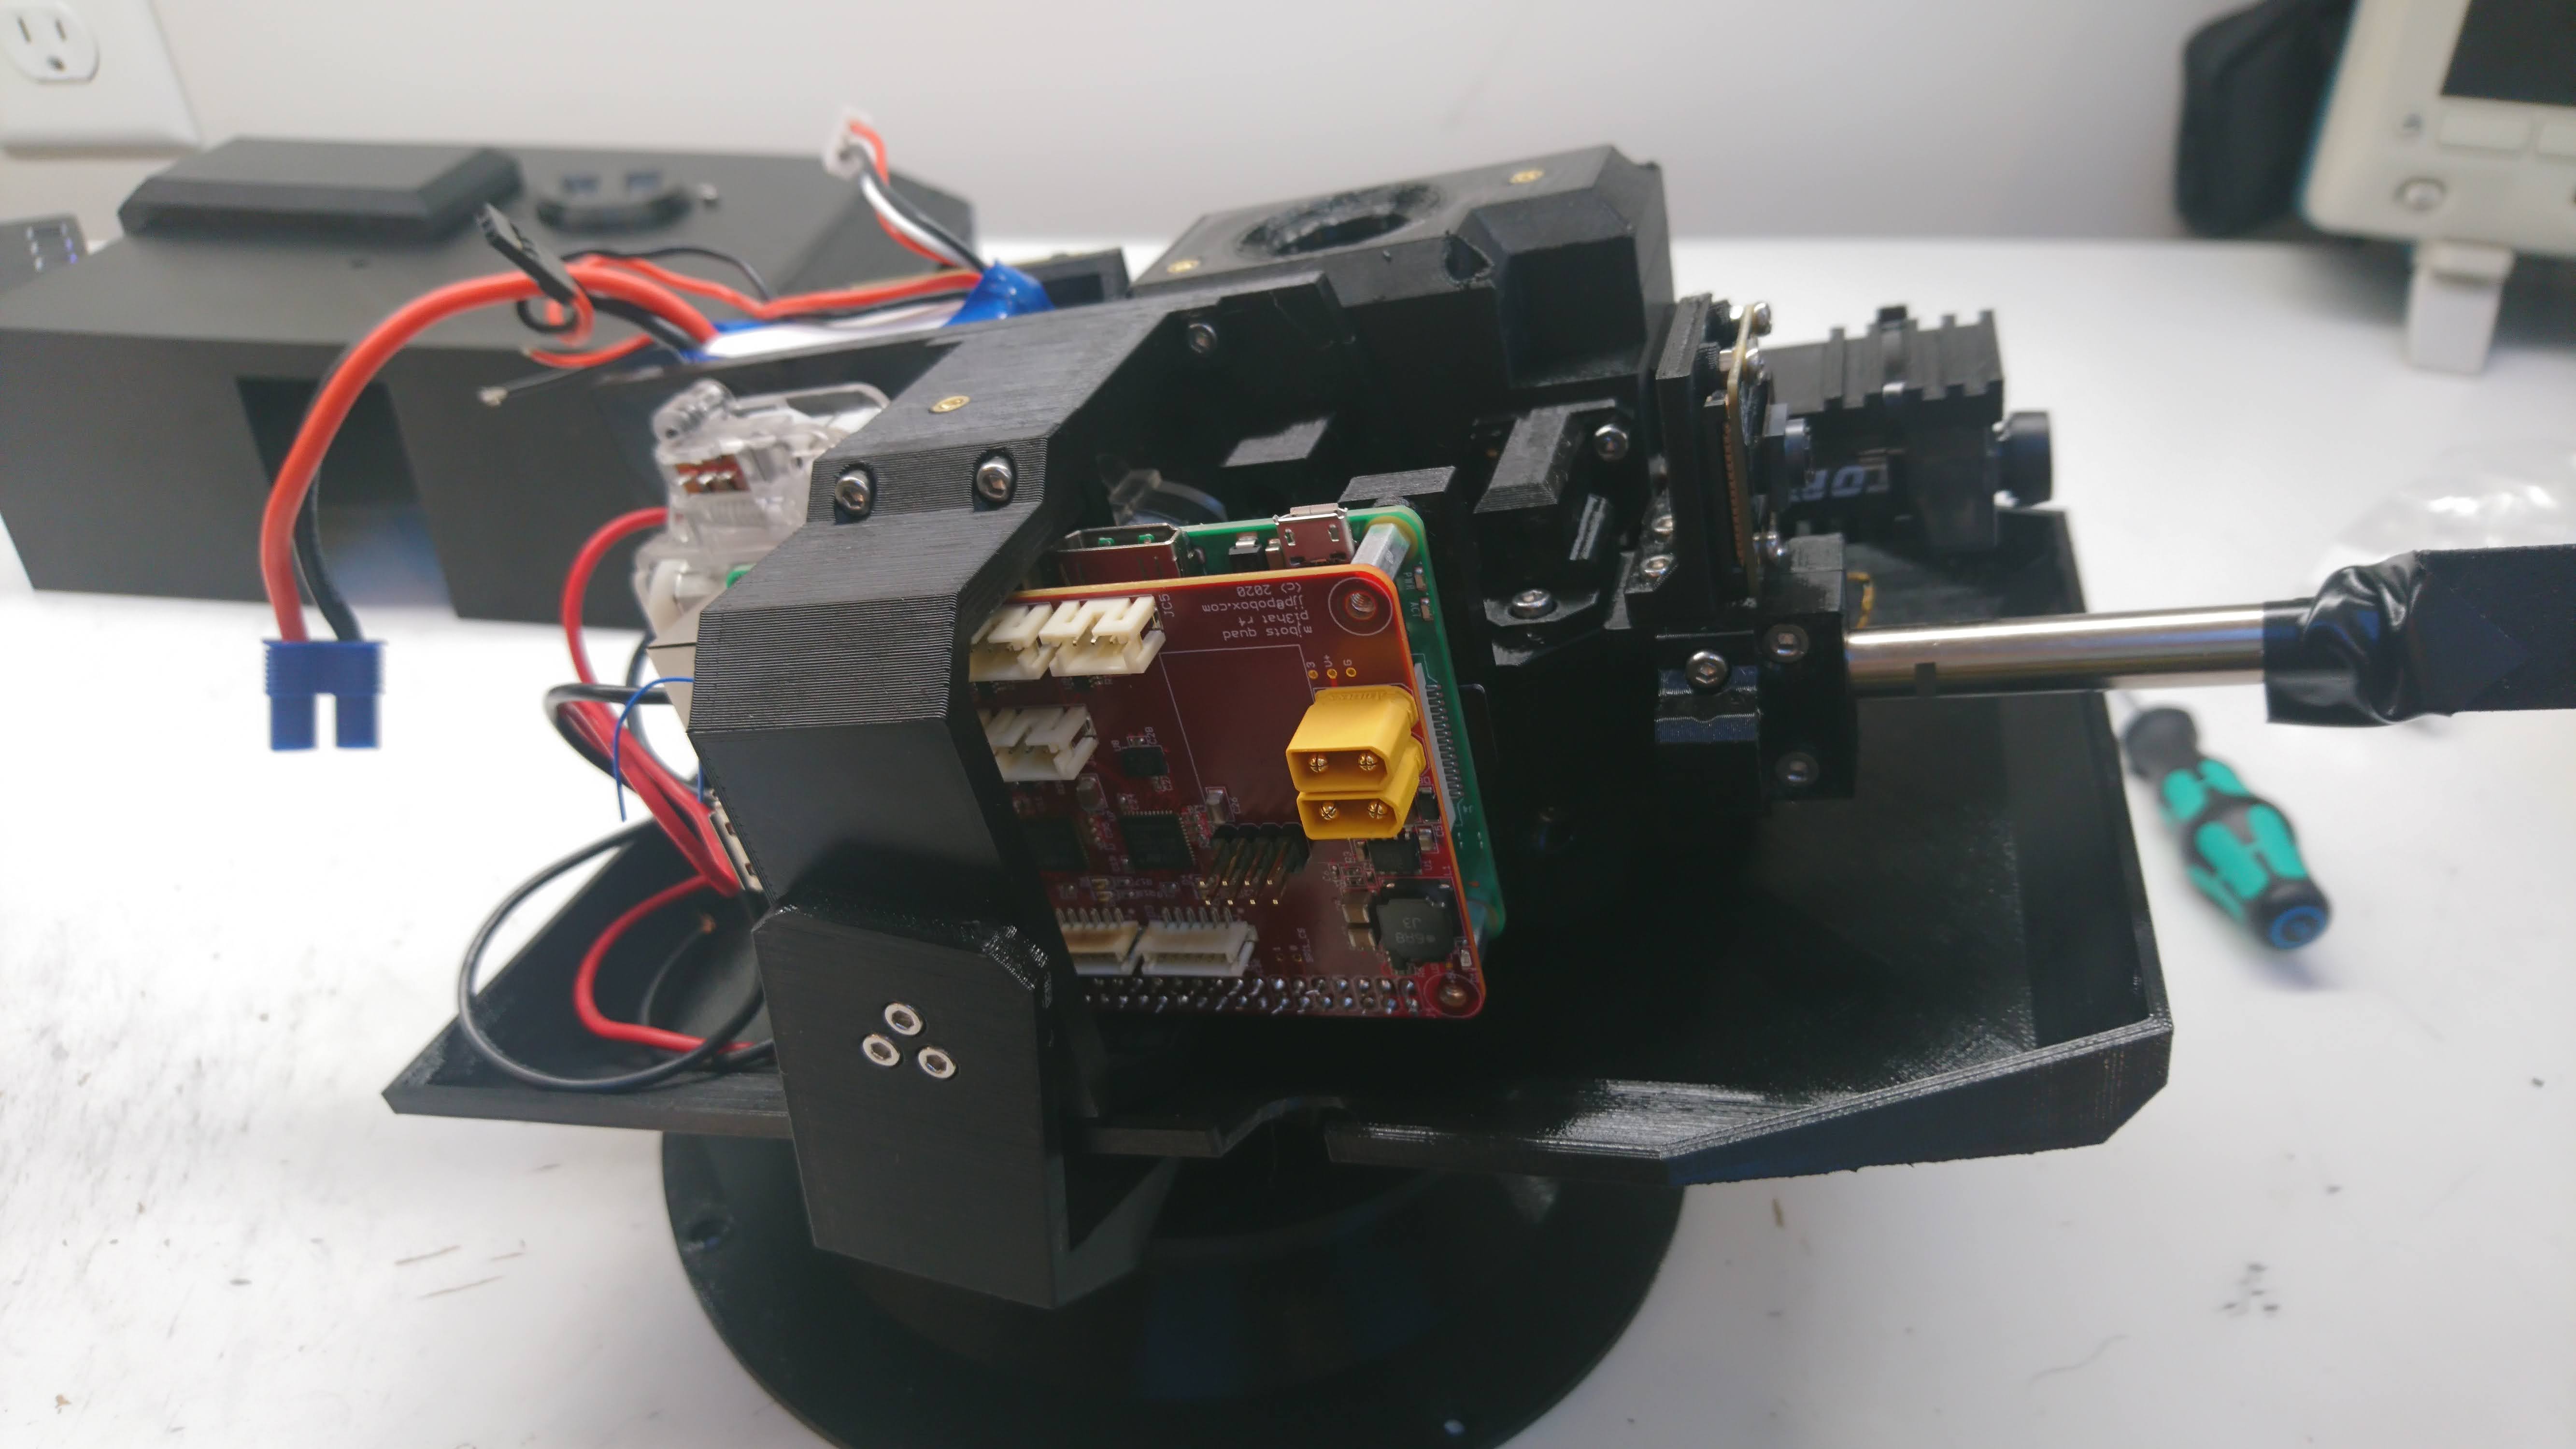
I’ve now got everything mostly in the box, and power and data wired up for everything but the AEG/loader (for which I still don’t have the board).
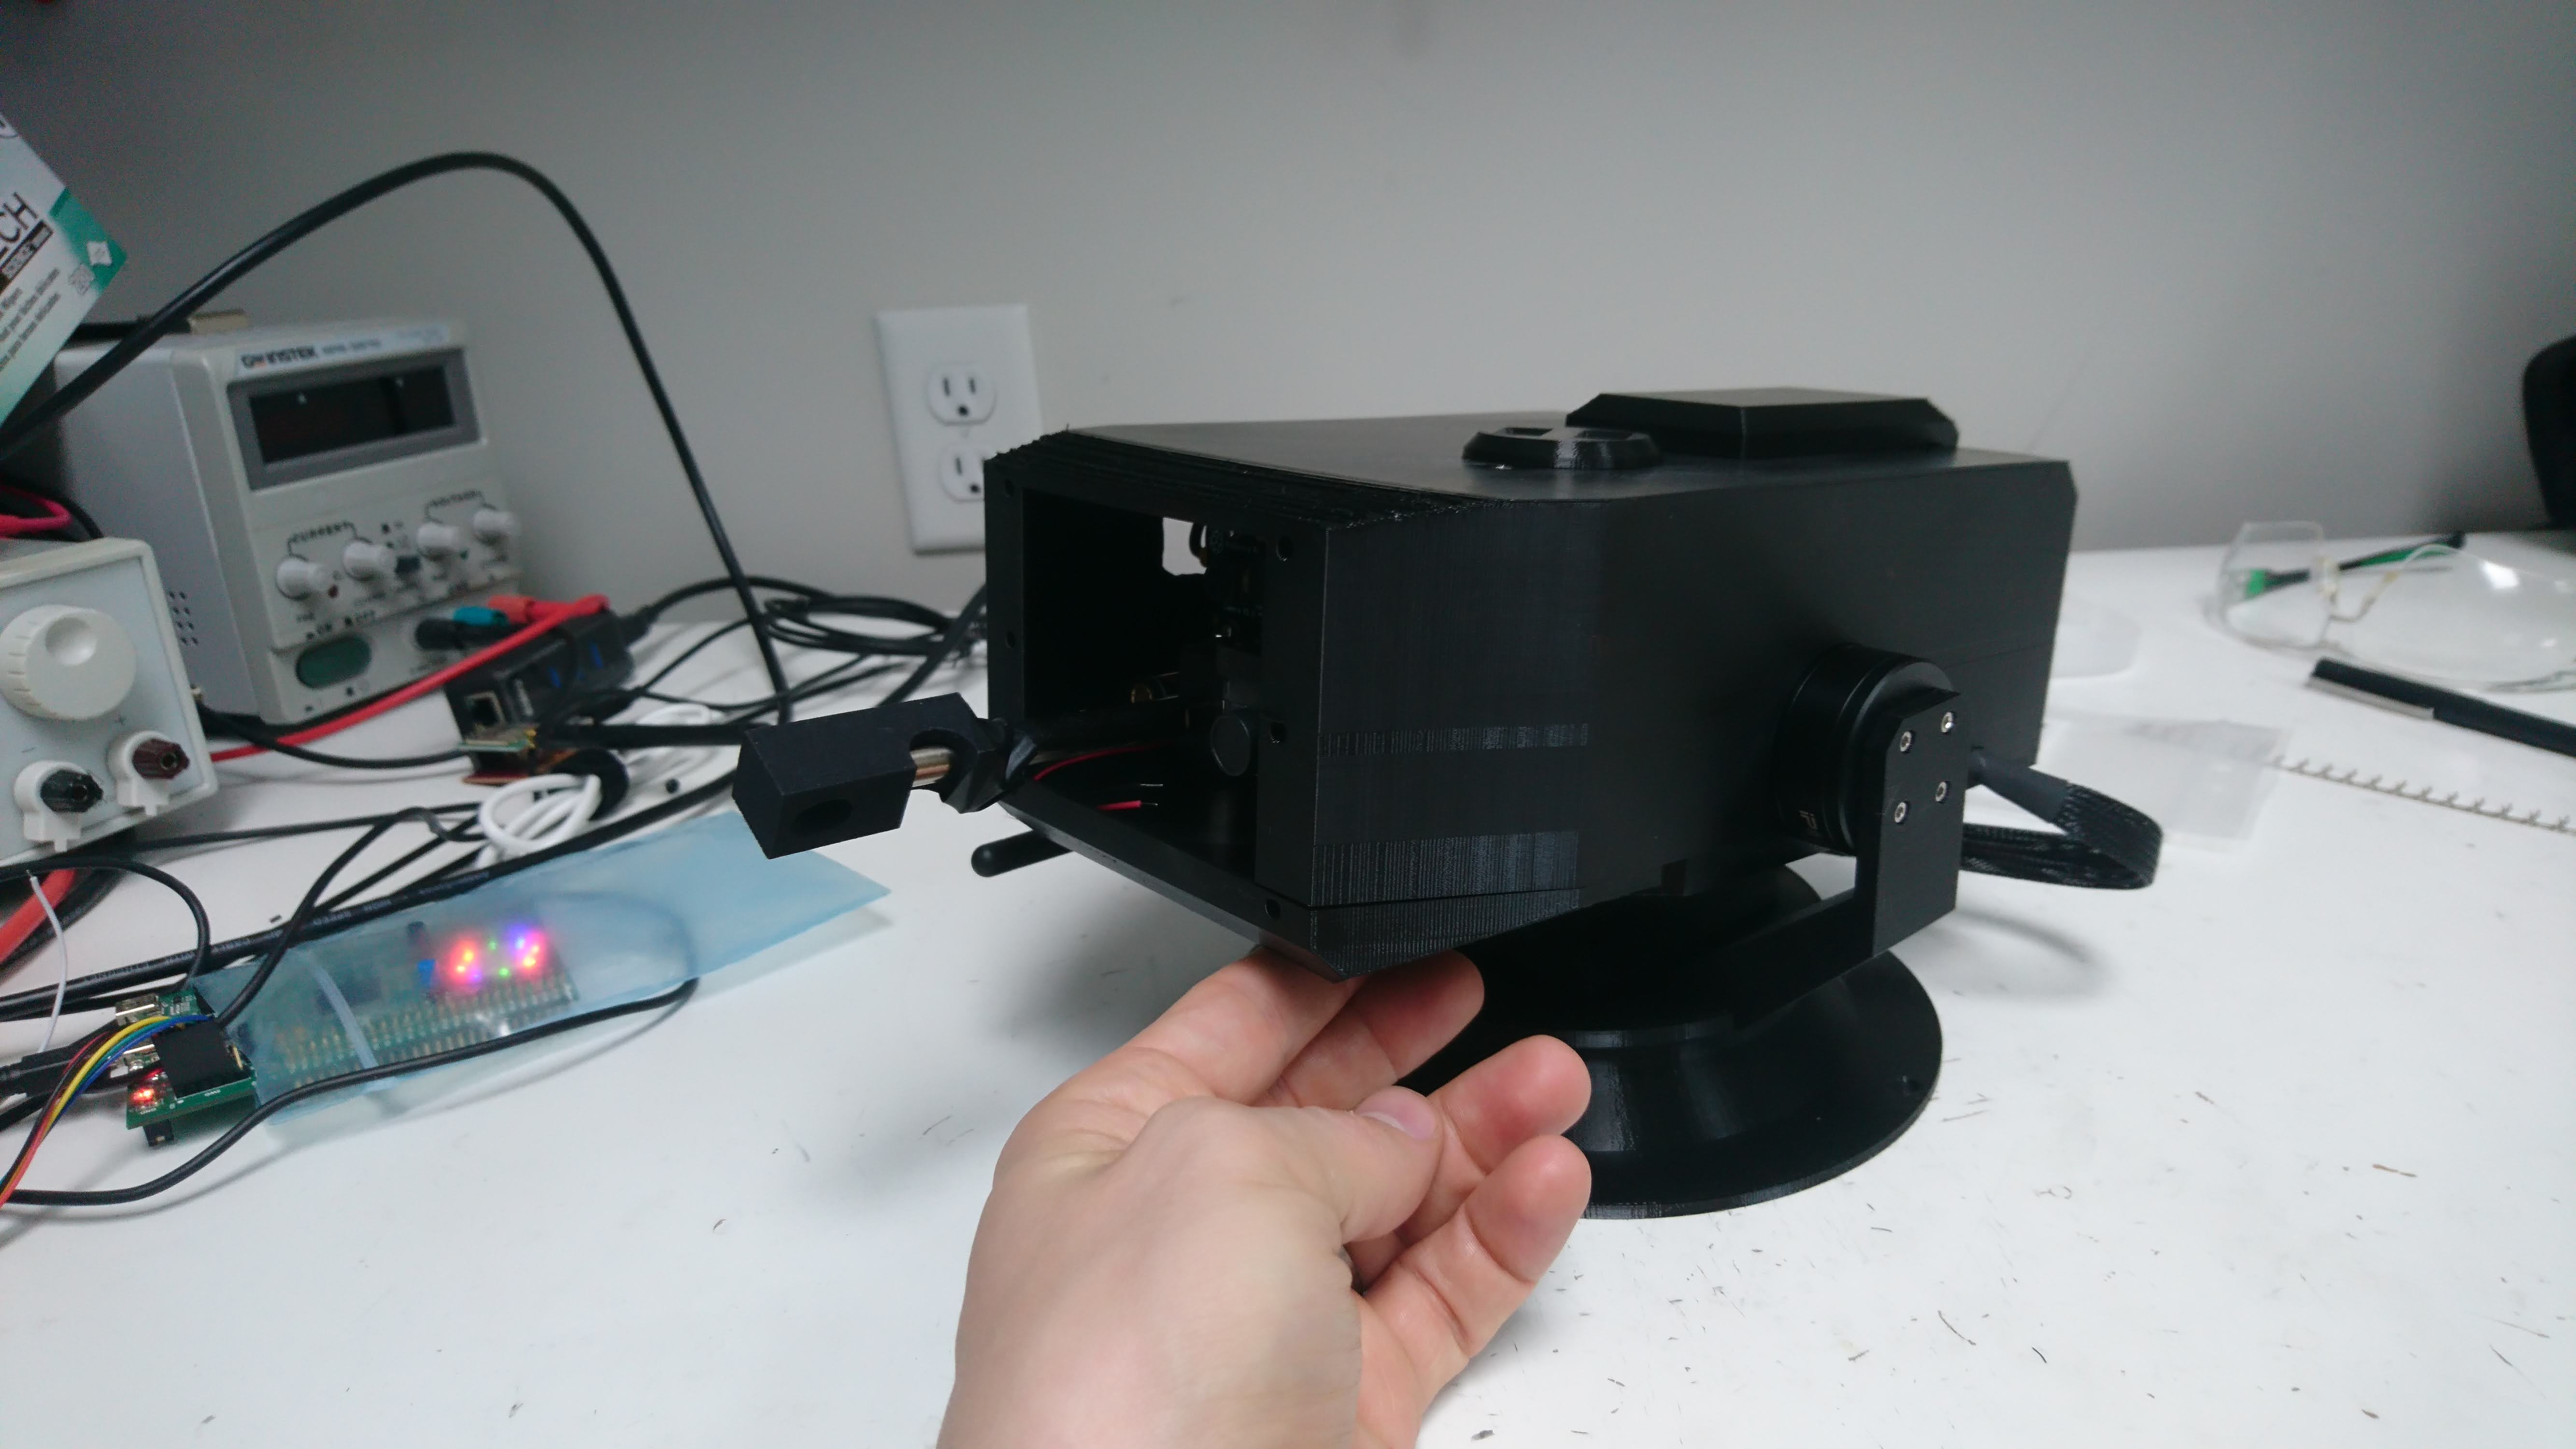
While I wait for that board, now it is time to write some software!
It’s the Box of Death! I like it 
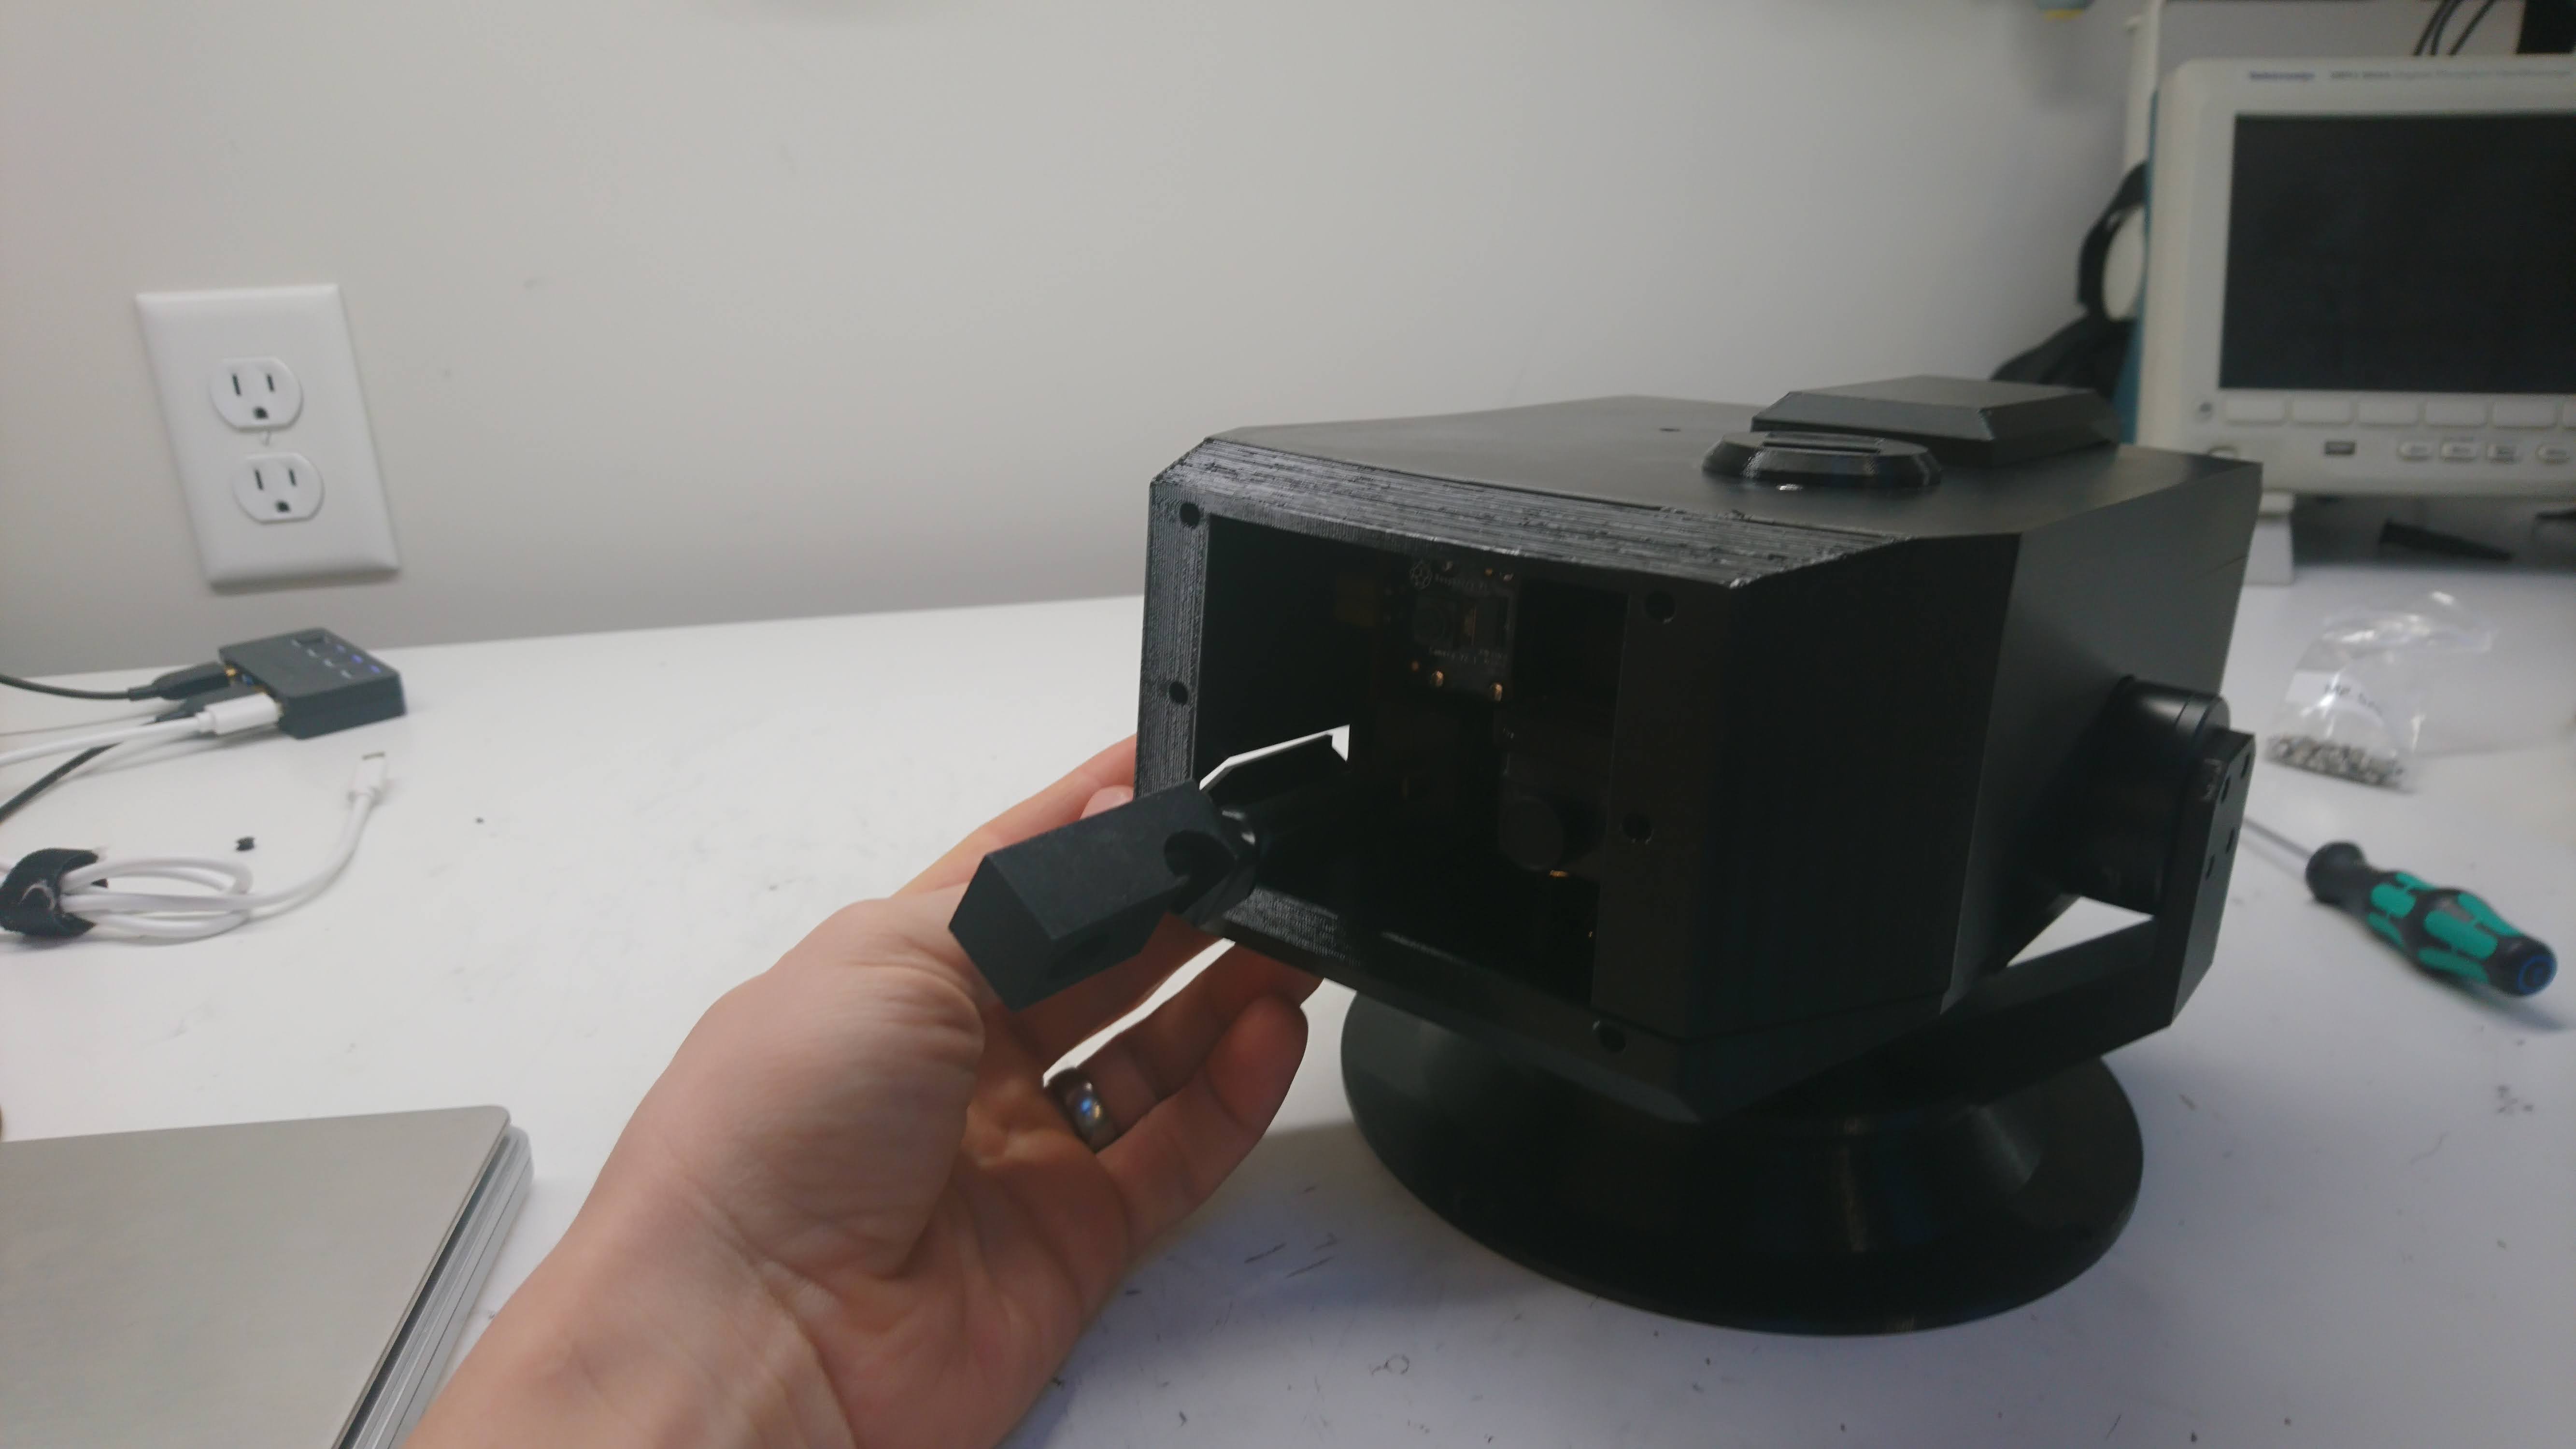
What is that open gap on the side at the end of the video? Is that just clearance for the power connector wiring?
Yeah, my F360 models aren’t perfect, so I’ve been doing some iteration with interference. That is my “temporary” clearance cutout. I’ll get around to re-printing that top one after I either get all done, or can’t continue with this one anymore.
Or you add a little bulge-out in the model, giving it more of that “knobbly military tech” look
1 Like
The loop is closed for the first time:
1 Like
I’m now back to the very primitive fiducial tracking I had with my previous generation turret. Theoretically I should be able to improve the performance a lot in this iteration, although that is yet to come…
So the way to beat your bot will be to try to not be in front of it!
(Or maybe slip in underneath between its legs …)
Yeah, or just camp close by so it can’t aim low enough!
And now it walks with the turret! This was in fact the second time it ever walked with the turret on it, and while my walking isn’t great yet absent turret, it is even worse with a turret and no tuning. Thus the crazy wobble and really slow speeds. However, the stabilization works 1000% better than my previous version. Even with the crappy walking, the picture is nice and smooth when looking forward or strafing.
And now I’ve got my little AEG driver board in and have it driving the BB loader, AEG, and laser. I spent about 10 minutes tuning the settings for both, and am pretty close to a 1/1 shot ratio. In this test, I had maybe 1 dry fire in 20 shots or so.
Next up is hook it up to the real control software, then mount it in its final location.